Create a New Company or Person
Last updated: November 11, 2026
Create a new customer/member record in the Novi admin (i.e. backend).
You have a few options when it comes to adding records to your Novi database:
Add a new dues-paying member (company or individual)
Add a new prospective member (company or individual)
Add a new inheriting or non-member (company or individual who inherits benefits from a member in good standing or has no member type)
Add records for an individual and their company at the same time
>> Learn more about membership statuses in Novi AMS.
Add A New Dues-Paying Member
To get started:
Go to the backend and click on the Add Company button, or click on the downward arrow on the right side of the button and choose Add Person, if relevant to your association.
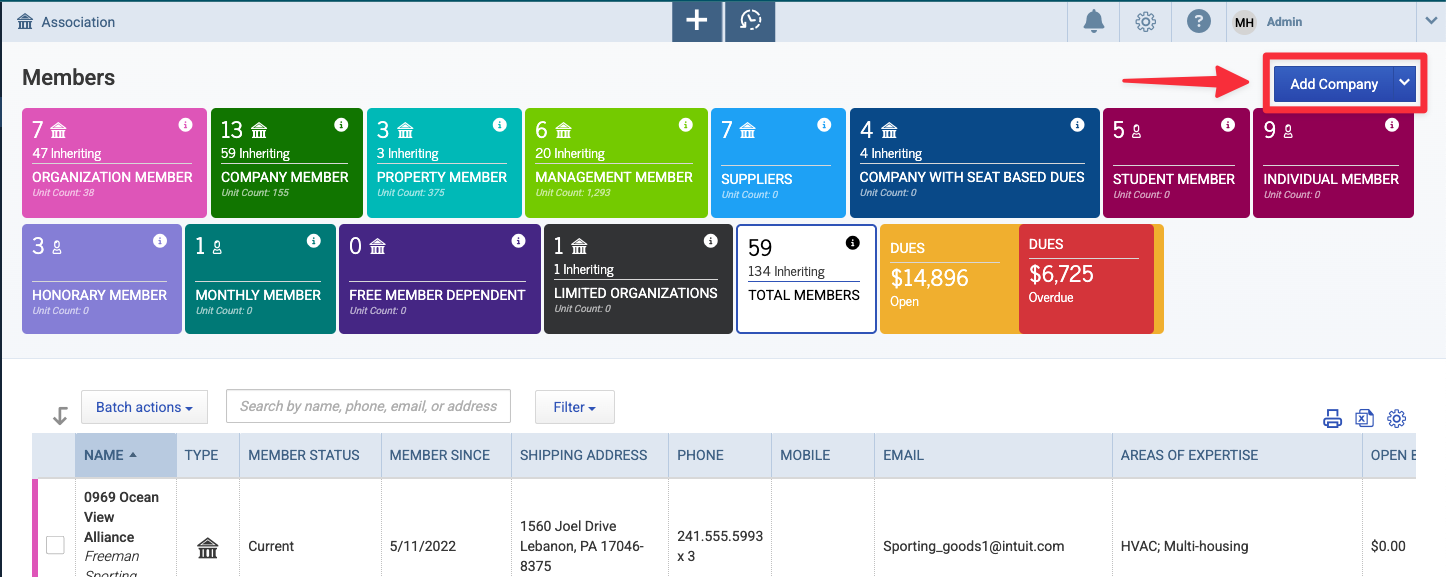
The "Create Membership" modal will appear...
Create the member record by entering the name and as much relevant information as is needed, including the appropriate Designated Member Type.
Then click the Save & Create Membership button at the bottom of the modal to proceed to the "checkout" screen.

The next screen in the modal will show the information below - update as needed:

Membership Summary - View the member type dues rules, both required and optional.
Important Note: You can delete optional dues rules or add-ons by simply clicking the trash symbol next to the price.
Member Since and Member Expiration Dates - Novi will automatically create these for you, but they're also customizable should you need to manually edit them.
Auto-Renew - Novi will automatically set membership to auto-renew. Simply uncheck the box if it's not the right choice for this member.
Charge for Dues - Choose to charge dues by credit card or invoice as soon as you create the record. If you've already charged the member or do not wish to charge the member, simply toggle the selection to OFF.
Auto-Approve: Regardless of whether the chosen member type requires approval, a toggle will show to give admins the choice to approve the start of benefits for this member. If the member is not auto-approved, they will appear as a pending member in Recent Signups for later action.
Send Welcome Email - If the member type has a welcome email enabled, you can choose to send it to this new member or not. If the member type does not have a welcome email enabled, the option will not be displayed. If the member does not have an email address, the toggle will be greyed out.
Important Note: If Auto-Approve is toggled off, the Send Welcome Email option will no longer be available. This is because the membership has not been approved yet. The welcome email will be triggered when the record is approved (either from the Recent Signups list or directly on the record).
Multiple Save Options - Choose between Save & Close, Save & Send (email the invoice), or Save & Print.
Add A New Prospect
A Prospect in Novi is any record that has the potential to become a dues-paying member. Examples include a company that may later become a member but needs to be tracked in the system or a previous member who may come back and re-join.
Adding a prospective member starts the same way as adding a new member above. To get started:
Go to the backend and click on the Add Company button, or click on the arrow right next to it and choose Add Person, if relevant to your association.
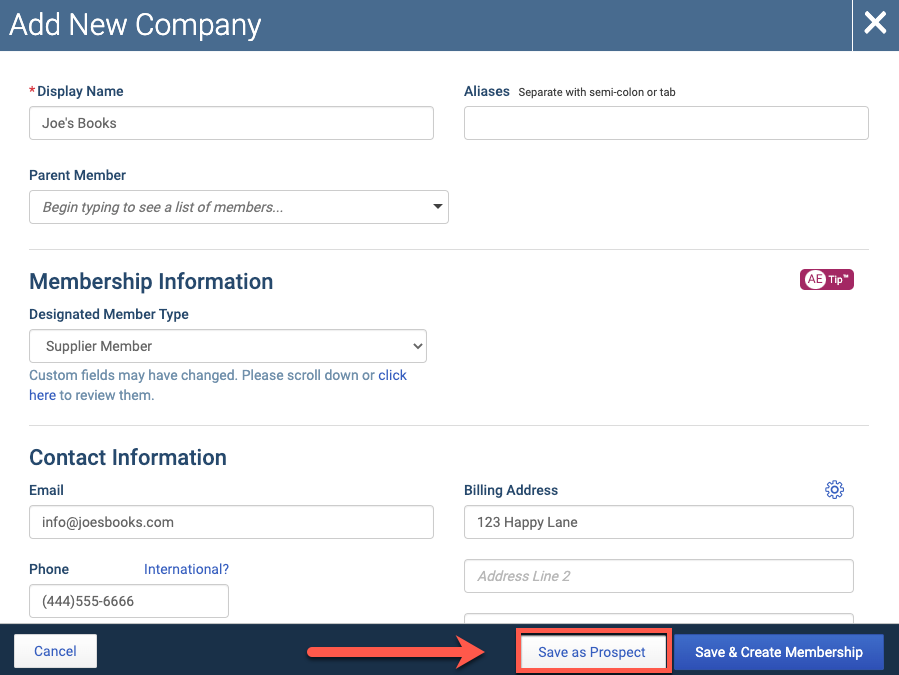
Enter the name and as much relevant information as possible, including the appropriate Designated Member Type.
Click the Save as Prospect button.
Your prospect record has now been created. To convert that record to a dues-paying member, go to the record's Details tab and click the Save & Convert Prospect to Member button (see screenshot below). This will immediately give you the "Create Membership" modal described previously so that you can finalize the membership and choose whether or not to charge for dues.
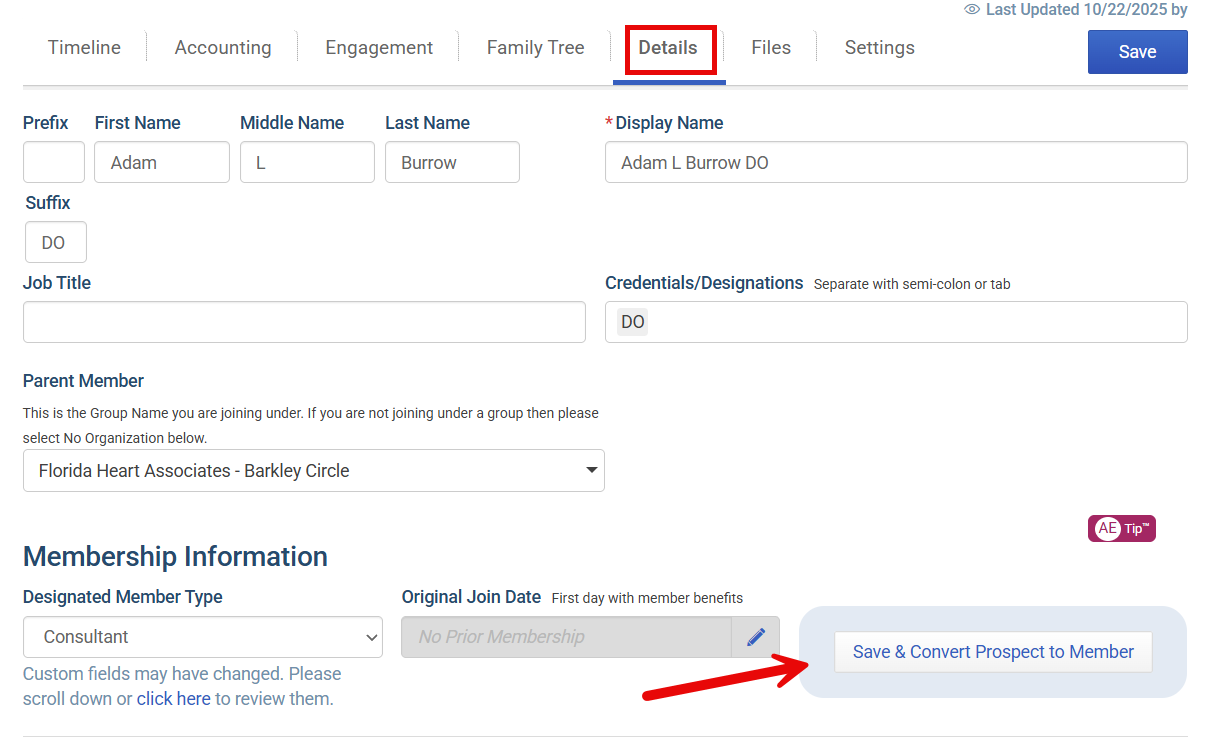
Important Note: A prospect does not have a Member Since or Member Expiration date.
Add A New Inheriting or Non-Member
A record with a Designated Member Type of "None Designated" is any company or individual who inherits benefits from a member in good standing, OR a true non-member that you want to add to your database (that is not a prospect). Note that if the member they are inheriting benefits from expires or doesn't renew, this record will no longer receive benefits.
To add the record:
Go to the backend and click on the Add Company button, or click on the arrow right next to it and choose Add Person.
Enter the name and as much relevant information as possible.
The Designated Member Type should be None Designated
If this record should inherit benefits from a member, be sure to add the appropriate Parent Member.
Click the Save & Close button to create the record.

>> Learn more about Designated and Effective Member Types in Novi AMS.
Add a New Company as an Individual's Parent Member
When adding or editing an individual in Novi, you can assign a Parent Member to connect them to a company in your database. If the company doesn't already exist, you can create a new company record directly from the individual's record.
This works both when adding a new person and when editing an existing person's record, so there's no need to create the company separately.
When Adding a New Person
When creating a new person record, begin typing the company name in the Parent Member field.
If the company already exists, select it from the dropdown list.
If the company doesn't exist, select Add [Company Name] to create a new company record.

When you select Add [Company Name], additional fields will appear at the bottom of the window. Complete these fields along with the individual's information to create both records at the same time.

The company creation fields only display fields configured as Admin Create, Key Information, or Required on Backend. Fields designated as Frontend Only will not appear. Additional fields can be accessed from the company's Details tab after the record is created.
Only one membership can be created at a time. If both the individual and company have a Designated Member Type, they cannot both receive a new membership through this process. Records without a membership created will be saved as prospects.
When Editing an Existing Individual
You can also create a new parent company directly from an existing person's record.
Open the individual's record and navigate to the Details tab.
Begin typing the new company name in the Parent Member field.
Select Add [Company Name] from the dropdown.
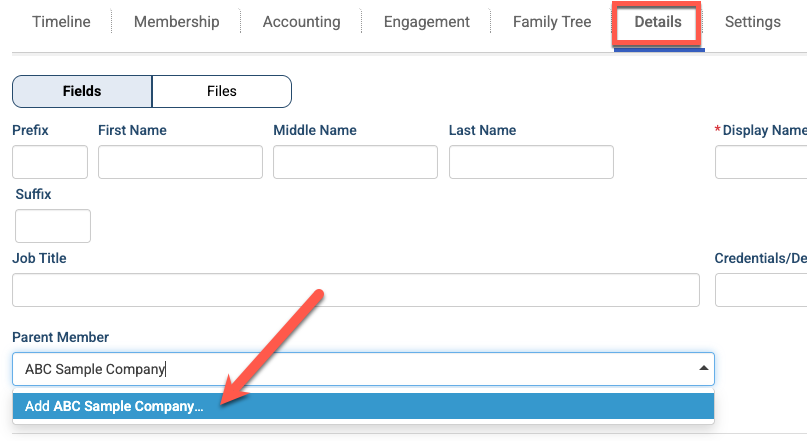
Additional fields for the new company will appear at the bottom of the Details tab. Complete the company information and save your changes.
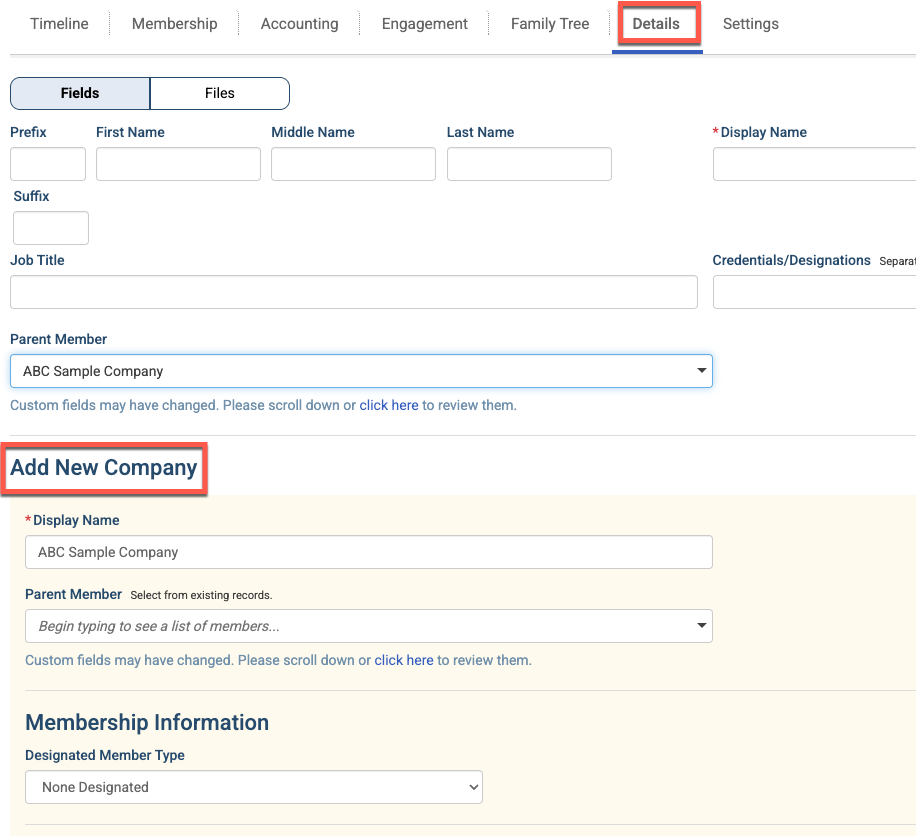
The new company record will be created and linked to the individual as their Parent Member.
Companies with Seat-Based Memberships
If you've created a new record for a person who should inherit benefits from their parent company, and that company is in a member type with seat-based dues - learn how to manage seats for an existing company member.